100 Days of SwiftUI
2026-05-08
Project 2, part 1
Guess the Flag — learn some of the many flags of the world
Guess the Flag: Introduction
Using stacks to arrange views
- stacks
HStack(horizontal)VStack(vertical)ZStack(depth)
- even though SwiftUI will show views without a defined
nStack, it’s better to be explicit because it will put your view where it wants - plus you can style the
nStackeasier - alignment: use
.leadingand.trailing(instead of left/right) to handle RTL languages - H- and V- stacks automatically fit their contents; preferring to align to the center of the view
Spacer()will “spring” the stack to the start of the view; you can use multiples of them
ZStackhas alignment but notSpacer()- draws views from top to bottom
- Stacks can hold other stacks
struct ContentView: View {
    var body: some View {
        HStack (spacing: 20) {
            VStack (spacing: 20) {
                Text("Cell 1")
                Text("Cell 4")
                Text("Cell 7")
            }
            VStack (spacing: 20) {
                Text("Cell 2")
                Text("Cell 5")
                Text("Cell 8")
            }
            VStack (spacing: 20) {
                Text("Cell 3")
                Text("Cell 6")
                Text("Cell 9")
            }
        }
    }
}
Colors and frames
- lots of ways to handle colors
background()modifier only affects text(?)- to color the background of the stack, use
Color.redbefore the text (remember the first line is the bottom of the stack)
These are identical:
(1)
ZStack {
Text("Your content")
}
.background(.red)
(2)
ZStack {
Text("Your content")
.background(.red)
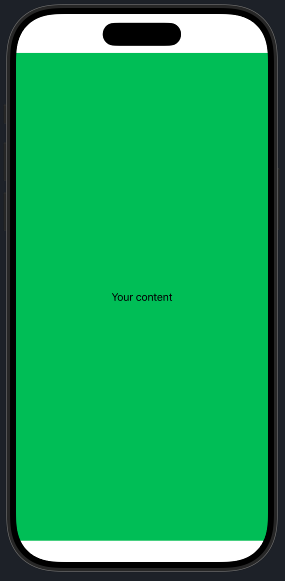
}This is interesting: if I use this code, I get green with white edges
ZStack {
    Color(.green)
    Text("Your content")
        }
However, if I use this code, I get something I didn’t quite expect (green with red edges)
ZStack {
    Color(.green)
    Text("Your content")
        }.background(.red)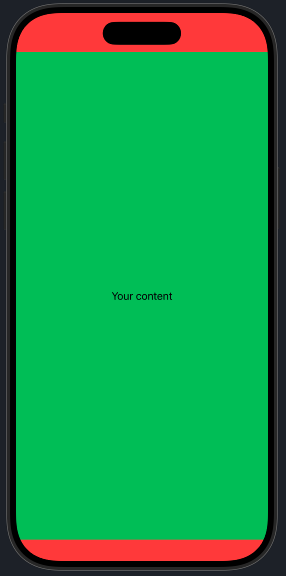
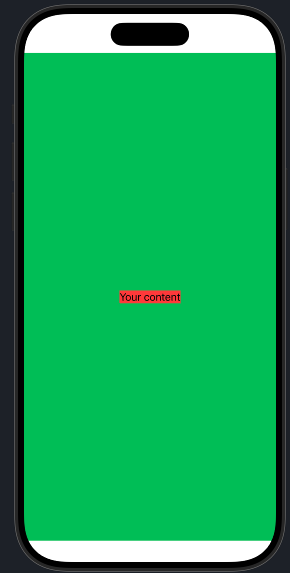
And if I use this code, I get what I expected from the previous code (green with white edges and text on a small red background)
ZStack {
    Color(.green)
    Text("Your content")
        .background(.red)
        }
Good to know!
.framecan restrict the size of the view. In this case theColor(.green)view can be restricted to a specific height and width, have min/max dimensions (including.infinity), etc.- this has an effect on how the
.background()modifier works too
- this has an effect on how the
Color()has built in colors but also “semantic” colors (e.g.Color.primary) — useful for light/dark mode switching- also can specify in RGBA (
Color(red: r, green: g, blue: b, opacity: a)) - by default it avoids “unsafe” areas: use
.ignoreSafeArea()to get the view to the edge (ok for decorative, be careful with functionality) background()can also accept “materials”
Gradients
- gradients are a way to make stuff ugly fast!
- requires an array of colors, size & direction, type of gradient
- you can also put in gradient stops
- types that can be used as Views:
LinearGradient(),RadialGradient(),AngularGradient()(controllable) - other type
.gradientcan be used to modify foregrounds and backgrounds (very subtle)
Showing alert messages
- basic alert has a title and a button to dismiss it
- we create a state that will be used to show and hide the alert, e.g.
@State private var showingAlert = false - then we attach it somewhere in the view using a modifier
.alert("Important message", isPresented: $showingAlert) { Button(...) } - all buttons on the alert will dismiss the alert message